ZScript_Basics
Appendix 2: Best Practices and Rules of Thumb
Note: This section is an appendix. This means that it’s not one of the main chapters that are meant to be read in a specific order, but rather a collection of additional useful information that may be referenced in various places in this guide. You can familiarize yourself with it gradually, as needed, instead of reading it from start to finish.
Even in our day and age there are lot of important best practices that are either unknown to many or often being overlooked. This section describes some of them—most of them are related to ZScript, but some are concerned with modding in general.
Table of Contents
- Using a consistent indentation style
- Using #include
- PK3 instead of WAD and folders instead of archives
- Using a consistent naming convention for your classes
- Using GitHub
Using a consistent indentation style
Indentation is the practice of using tabs and/or spaces at the start of lines of code to identify which code block they belong to. They’re covered in surprising detail on Wikipedia, so go have a look. Many new coders (sometimes even the not-so-new ones), including people who have been working with DECORATE for years, often have little care for indentation, which causes a serious issue: their code is hard to read.
Your instinctive reaction, most likely, is to say, “I can read my code just fine, thank you very much!” This, however, isn’t the point. Messy code leads to some major problems:
- You’ll eventually inevitably have problems reading your own code. You may think you won’t, and perhaps you don’t—for now. But when you decide to come back to some code you wrote months or years earlier, you’ll be surprised how hard it is to navigate it.
- You’ll have a much harder time getting help from others—and not because everyone is a snob who only wants to read well-written code, but because it’s genuinely hard to read somebody else’s code that isn’t well-organized.
- While an average player may not be concerned with it, clean code will make a good impression on other modders and creators.
In short: check out existing indentation styles, pick Allman or K&R (since the absolute majority are using one of those) and use it consistently. Remember, this is how it should look (using Allman because this is the style I use throughout this guide):
class MyClass : Actor     //level 1 header
{
    int foo;                  //level 1 code
    string bar;
    property bar : bar;
    Default                   //level 2 header
    {
        property1;                //level 2 code
        property2;
        property3;
        +FLAGNAME
    }                             //end of level 2 block
    States                    //another level 2 header
    {
    Spawn:                    //state labels may or may not be indented further (see notes below)
        SPRT A 1;                 //level 2 code
        loop;
    Death:
        SPRT B 5 A_Function;
        SPRT CD 5                 //level 3 header
        {
            A_Function1();            //level 3 code
            A_Function2();
        }                             //end of level 3 block
        SPRT E -1;
        stop;
    }                             //end of level 2 block
}                              //end of level 1 block
There is some discussion regarding how to indent the contents of the States block though, but both of these options should be fine:
// Considers state labels as new-level headers:
    States
    {
        Spawn:
            SPRT A 1;
            loop;
        Death:
            SPRT E -1;
            stop;
    }     //this awkward closing brace is too far

// Only considers state contents as new-level code,
// but not the labels (similarly to switch blocks):
    States
    {
    Spawn:
        SPRT A 1;
        loop;
    Death:
        SPRT E -1;
        stop;
    }
Final notes:
- GZDoom itself consistently uses Allman (both in its ZScript definitions and the C++ engine code), same goes for most examples on ZDoom Wiki.
- Other styles exist, but considering ZScript is styled after C# / Unrealscript, it makes sense to choose one of the two most popular styles that are used in those languages.
- If you copy-paste a snippet of code from somewhere, don’t be lazy and change its indentation to your style if they don’t match.
Using #include
It’s not a good idea to place all of your code inside zscript file at the root of your archive. Instead you should create a folder with a name you prefer, such as MyModName_Scripts and place zscript files with appropriate names in it. (This assumes you’re using a PK3, of course.) After that you need to use #include in the root zscript lump to add those files. An example of how a structure like that could work:
If your files and folders look like this…
MyWeaponMod.pk3/zscript.zs
MyWeaponMod.pk3/MyWeaponMod_Scripts/weapons/pistol.zs
MyWeaponMod.pk3/MyWeaponMod_Scripts/weapons/shotgun.zs
MyWeaponMod.pk3/MyWeaponMod_Scripts/monsters/zombieman.zs
…the contents of zscript.zs would look like this:
version "4.3.0"

#include "MyWeaponMod_Scripts/weapons/pistol.zs"
#include "MyWeaponMod_Scripts/weapons/shotgun.zs"
#include "MyWeaponMod_Scripts/monsters/zombieman.zs"
Notes:
- Do not place your custom scripts in
ZScript/folder. This is the folder name that gzdoom.pk3 uses; if by chance your file matches an existing zscript file, it’ll try override it (chances are small, of course, but it’s not impossible).Zscriptlump at the root of the archive is the only one that can’t be overridden, but your custom scripts should be placed in a unique folder. - File extension doesn’t matter, but
.zsand.zscare some common choices for ZScript. Syntax highlighting plugins will recognize them automatically.
PK3 instead of WAD and folders instead of archives
Using WADs as a sole method of storing data is still popular. Avoid this! WAD files should only be used for maps (and this is the only format that works for Doom maps). Everything else—textures, sounds, models, any sort of assets, and your code—should be inside a PK3 for ease of use and access. ZDoom wiki describes how to structure a PK3 in detail.
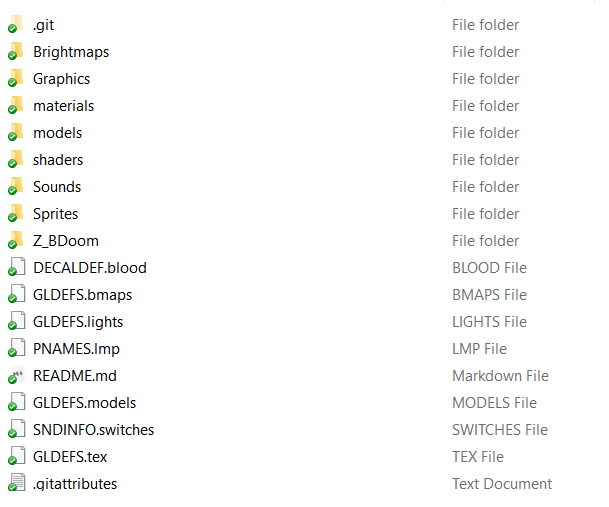
However, a next-level strategy would be using a folder instead of an archive. Specifically, instead of having a packed PK3 (which, remember, is just a zip file), you can unpack it and keep it as an unpacked folder that uses the same internal structure as PK3 would. For example, this is how a development version of Beautiful Doom looks in a folder on my PC:
GZDoom can run folders in the same way it can run archives:
gzdoom.exe -iwad doom2.wad -file FOLDERNAME
SLADE can also open folders using File > Open Directory.
So, what are the advantages of this method? Basically, there are two.
First, you can stop using SLADE. Or rather, you’ll likely still need to use it to set sprite offsets, optimize PNGs and use TEXTURES visual editor, but otherwise you can easily use other software to edit your files. You can use something like Notepad++ with ZScript syntax highlighting to edit your scripts—while they won’t have pop-up tips, like SLADE does, you will have a much easier time saving them and switching between tabs. In fact, you won’t have to worry that you forgot to save something before closing the archive, saving changes will be faster, and there won’t be any chance of SLADE corrupting data (which can happen sometimes).
Second, you’ll be able to upload your mod to a GitHub repository.
Using a consistent naming convention for your classes
Very often, when creating their first custom classes, new modders resort to names like Demon1, Pistol_, MyShotgun and such. None of these are particularly great for the following reasons:
- Many mods nowadays are compatible with each other, or other users may make compatibility patches for them. If that happens, using such generic class names will likely result in name conflicts with other mods, and you’ll have more tedious work on your hands.
- You may face name conflicts even with existing GZDoom classes. For example,
Demon1is actually an existing Hexen actor. - More specific names function as a sort of a “signature” that helps to clearly define which mod/author they’re from. This makes your code cleaner if you’re, for example, using classes/libraries made by other users in your project.
To make a good naming convention, note the following:
- A class name should be descriptive for you, not for the player. Players never see class names; they either see pickup messages or tags, which are defined via properties (and, ideally, via the LANGUAGE lump). Class names are a technical thing and they should be convenient for you. For instance, if you have a custom strong powerup in your mod, don’t name the class
HugeFrigginPowerup; rather use something descriptive, such asRegen_Speed_Powerup. - It’s common practice to use the same prefixes for all your classes within a project. Often those prefixes match the name of the project (for example,
D4D_Shotgunfor a Shotgun in the Doom 4 Doom mod) or are initials of the author (for example, I often useJGP_for Jekyll Grim Payne in the classes in my public libraries, like GZUnmaker).
Using GitHub
GitHub is a cloud-based service designed for easy version control and release of software. If you’re keeping your mod in a folder, you can register on GitHub, install the GitHub app and turn that folder into a GitHub repository. Working with GitHub is pretty easy, and the process is covered by its own extensive documentation—you can begin with an intro guide here.
A good number of well-known mods use GitHub because of the obvious benefits:
- Your work stays safe in the cloud, so you’ll never lose your progress (as long as you pushed the changes into the repository; it’s not being updated automatically).
- You can easily track changes for every file in your project: GitHub will highlight the changes of the contents, inform you about any deletion/addition, and you’ll be able to roll back any of those changes at any point.
- You can easily release your work using GitHub’s release feature. Once you’re ready to make a release, GitHub will automatically compile your folder in an archive. That archive will be playable in GZDoom as is.
- You can easily collaborate with other people—this is, in fact, one of the primary purposes of GitHub. People can be added as contributors to your repository, or they can make pull requests (user-made updates to your work) which you can accept to decline.