ZScript_Basics
Appendix 1: Flow Control
When you call functions, change values and do other things within a code block (an anonymous function, a virtual function override, etc.), these changes are executed in a certain order, following the specified conditions. To control this flow, you need to know how to use statements and operators.
This chapter will also cover flow control in actor states, which work similarly to functions but not exactly in the same way.
Table of Contents
Operators and operands
Operators are symbols that define relationships and interactions between operands. In the expression A + B A and B are operands, while + is the operator of addition. In the expression if (A == B) A and B are operands, and == is a relational operator that checks if operands’ values are equal to each other.
Operators used in ZScript are similar to the ones used in the C-family languages. They can be split into the following categories:
- Arithmetic operators
- Relational operators
- Logical operators
- Assignment operators
- Bitwise operators
- Miscellaneous operators
Arithmetic operators
Basic arithmetic operations like addition, subtraction, multiplication, division, modulus operations, increment, and decrement. They’re used to change the value of a numeric operand.
-
+— addition:// Ddefine an integer variable 'i' equal to // the actor's current health value plus 100: int i = health + 100;// Set the actor's health to its current value // plus the actor's target's current health value: A_SetHealth(health + target.health); -
-— subtraction:// Move the actor vertically and place it 1 unit // below the height of the current sector's ceiling: SetZ(ceilingz - 1);// Defines an integer variable 'i' that is the difference // between the absolute vertical positions of this actor // and this actor's target: int i = pos.z - target.pos.z; -
*— multiplication:scale = scale * 0.5; // reduce the actor's current scale by 50%A_SetHealth(health * 0.8); // set the actor's current health to 80% -
/— division:// Define a double value 'projvel' that is equal // to the distance to target divided by 35: double projvel = Distance3D(target) / 35;(If a projectile is then fired at the
targetwith velocityprojvel, it’ll reach the goal within 35 tics, i.e. a second)IMPORTANT NOTE: In many programming languages there are two separate division operators: one for integer division and one for float-point (or double) division. In ZScript there’s only one, which means that if both numbers are integers, the result will be an integer as well, and the part of the number after the point will be automatically truncated (removed). So, for example,
5 / 2in ZScript equals2, not2.5.This can be avoided by making sure that one or both operands are doubles, by doing one of the following:
-
giving it a point, optionally followed by a zero, i.e.
5.0or5.; -
explicitly defining it as a double by doing
double(5).So,
5. / 2, as well as5 / 2.equals2.5.
-
-
%— modulus operation returns the remainder after dividing the first operand by the second operand:// This check will return true every time the // current level.time can be divided by 35 // without a remainder, i.e. every 35 tics (1 second): if (level.time % 35 == 0) -
++— increments the value (adds 1 to it):int steps; //define an integer variable 'steps' if (steps < 10) //check if it's below 10 { steps++; //if true, add 1 to the current value of 'steps' }(
steps++is the same as doingsteps = steps + 1) -
--— decrements the value (decreases it by 1):int steps; //define an integer variable 'steps' if (steps > 0) //check if it's above 0 { steps--; //if true, subtract 1 from the current value of 'steps' }(
steps--is the same as doingsteps = steps - 1) -
**- takes the value to the specified power:int i = 2 ** 8; // i = 256 because 2 to the power of 8 is 256
Note on placement of increment/decrement operators
Operators of incrementation can be placed both after and before a value. So, both value++ and ++value are correct. The difference only occurs if you perform multiple operations, such as incrementing and checking the value at the same time. For example:
int myVal = 5;
bool isBigger = myVal++ > 5;
In the above example myVal is first checked against 5, and after that myVal is incremented. As a result, boolean isBigger will be false, because at the moment of checking myVal will still be equal to 5.
Compare:
int myVal = 5;
bool isBigger = ++myVal > 5;
In this example myVal is first incremented, and after that checked against 5. As such, isBigger will be true, because myVal will be equal to 6 before the check.
It’s a relatively niche case, but it’s something important to be aware of.
Assignment operators
Assignment operators are used to set a value. They don’t check or compare, they simply change the value. You’ll normally use them to change the values of variables.
-
=— assigns a certain value to the operand:// Ddefines integer variable 'i' // and sets its value to 10: int i = 10;// Set the calling actor's gravity to 0.4: gravity = 0.4;// Sets the calling actor's mass to be equal // to their current health value: mass = health; -
+=— adds a value to the current value of the operand:// Add 1000 to the current mass value // of the calling actor: mass += 1000;// Increase the calling actor's current vertical velocity // by a random double value betweem 1.0 and 4.0: vel.z += frandom(1,4);a += bis a shorter versiona = a + b:// These do the same thing: gravity += 0.5; gravity = gravity + 0.5; -
-=— subtracts a value from the current value of the operand:// Decrease the calling actor's angle by 45, // which will turn the actor 45 degrees to the left: angle -= 45; -
*=— multiplies the current value of the operand by the given value:// Decrease the calling actor's scale (sprite size) by 1%: scale *= 0.99; -
/=— divides the current value of the operand by the given value:// Reduce the calling actor's alpha (translucency) // by 50%: alpha /= 2; // This does the same: alpha *= 0.5;Note: changing alpha will only work if the actor’s
renderstyleis of type that supports translucency (e.g.'add'or'translucent'). -
%=— gives the remainder of dividing the first operator by the second operand:int i = 10; i %= 2; // Result: 'i' is equal to 0, because 10 equals // 2 * 5 without a remainderint i = 10; i %= 3; // Result: 'i' is equal to 1, because 10 equals // 3 * 3 plus 1 as remainder
Relational operators
Used to check whether two values are equal, or whether one is greater than, less than, greater than or equal to, or less than or equal to one another. These operators are used in checks, such as if, while, for, etc. (more on those below).
-
==— checks if operands are equal to each other. This can be used for integers, doubles, bools and pointers.-
For numeric (integer and double) values this operator check the actual numbers against each other:
if (health == 100)
{
    // True if health is exactly equal to 100
}
With boolean values this operator can be used to check if they’re
trueorfalse:if (target.bISMONSTER == true) { // True if the calling actor's target // has the ISMONSTER flag }Note that true/false checks can be shortened as follows:
// These do the same thing:

if (target.bISMONSTER)
{...}

if (target.bISMONSTER == true)
{...}
This operator can also be used with pointers to check if they’re the pointers to the same actor:
if (victim == target)
{
    // Is true if 'victim' and 'target' pointers point to the same actor.

    // This check is used in SpecialMissileHit overrides
    // to check if 'victim' (the actor hit by the projectile)
    // is the same as projectile's 'target' (the actor who shot it).
    // It makes sure projectiles can never hit their shooters.
}
Checking pointers against
nullallows to check if that pointer is empty (you already know this as null-checking):if (target == null) { // True if the calling actor doesn't have a target }Note: make sure you do NOT confuse
==with with=— an operator used to actually change values. (See Assignment Operators above.)
-
-
!=— checks if operands are not equal to each other (the inverse of the above):if (mass != 0) { // True when the mass of the calling actor isn't equal to 0 }if (master != target.master) { // True if the calling actor's master is not the same // as its target's master. }This operator is often used in null-checks:
if (target != null)
{
    // This block will be executed if the calling actor has a target
}
Note that null-checks can be shortened, just like boolean checks, as follows:
if (target) //this is the same as if (taget != null) if (!target) //this is the same as if (target == null)!is actually a separate operator that is covered below, under Logical operators. -
~==— checks if the first operand is approximately equal to the second one: this is the same check as==but it can be used with doubles to add a very small margin of error to the check. It’s very often used with velocity checks (as you remember,velis a vector3 that consists of 3 doubles):if (vel ~== (0,0,0)) { // True if the calling actor's velocity // is approximately equal to zero }For all intents and purposes this check is pretty much the same as
if (vel == (0,0,0)), but edge cases are possible, so for doubles it’s recommended. It’s slightly less performance efficient than==, but most of the time the difference is negligible.~==doesn’t work with integer values. -
>— checks if the first operand is greater than the second:if (health > 0) -
<— checks if the first operand is less than the second:if (mass < 500) -
>=— checks if the first operand is greater than or equal to the second:int i = pos.z - target.pos.z; if (i >= 0) { // Execute this block if the calling actor's // vertical position is above or equal to // the target's position. } else { // Otherwise execute this block } -
<=— checks if the first operand is less than or equal to the second:// Destroy the calling actor if their position is // at or under the current sector's floor: if (pos.z <= floorz) { Destroy(); }
Logical operators
These operators are used to combine multiple checks.
-
&&— logical AND. This operator is used to check if all operands or statements are true:if (target && target.health > 0) { // True if the calling actor has a target // and that target's health is above 0 }// Define a random number between -1000 // and 1000: int i = random(-1000, 1000); if (i > 0 && i <= 100) { // True if 'i' is above zero and under or equal to 100 }
Note, in case there are multiple checks, the game won’t proceed to the next check unless the previous one is true. So, for example in this case:
override void DoEffect()
{
    super.DoEffect();
    if (owner && owner is "PlayerPawn")
    {
        [...]
    }
}
…if owner is null, the string of checks will stop there. As such, the following owner is "PlayerPawn" check will not result in a VM abort, because if owner is null, the next check simply won’t be executed.
What it means, always put the most important and the simplest check first, because this will be both safe and more performance efficient.
-
||— logical OR. This operator is used to check if any of the operands/statements is true:if (target is "PlayerPawn" || target.bISMONSTER) { // True if the target of the calling actor // is a player pawn (a player-controlled actor) // or if it has a ISMONSTER flag (i.e. is likely a monster) }if (vel ~== (0,0,0) || pos.z <= floorz) { // True if the calling actor is not moving or // if it's on the floor (or, for some reason, below it) }OR checks work the same way as AND checks, just inverted. Which means, if the first condition is true, it won’t proceed to the second condition.
-
!— logical NOT. This operator allows to invert any check or even a whole statement. For example:if (!target) // Checks if target pointer is null, same as 'if (target == null)'if (!(vel == (0,0,0)) || !bNOGRAVITY) // Returns true if the calling actor's velocity is NOT zero OR the calling actor does not have a NOGRAVITY flagif (!master && target)) // This will true if the calling actor does NOT have a master but does have a target -
?— a ternary operatorThis operator can be used as a short version of an IF/ELSE block:
int foo = <condition>? 5 : 10; // if condition is true, foo = 5, otherwise foo = 10
Note, a ternary operator can only be used if both possible values are explicitly of the same type. For example, it’s not possible to combine a string and a name value, both have to be either strings, or names:
// We can't use "none" because double quotes would turn
// it into a string, whereas GetClassName returns a name:
name clsname = target != null? target.GetClassName() : 'none';

// Conversely, we can't use GetClassName directly here,
// because it returns a name, not a string:
string clsnameStr = target != null? ""..target.GetClassName() : "None";
For actor pointers, null needs to be explicitly cast as Actor:
// This sets the foo pointer to the target pointer, if it's not null;
// otherwise it sets to null. Note that we need to use Actor(null),
// because just null won't be recognized as a null actor pointer:

Actor foo = target != null? target : Actor(null);
All logical operators can be combined with the help of parentheses:
// This check will pass if target exists, AND target isn't killed
// (doesn't have KILLED flag), AND it's either a PlayerPawn OR a monster:

if (target && !target.bKILLED && (target is "PlayerPawn" || target.bISMONSTER))
// This will pass if the calling actor has a target
// and that target is PlayerPawn, OR if the calling actor
// has a master, that master has a target, and
// the master's target is PlayerPawn:

if ((target && target is "PlayerPawn") || (master && master.target && master.target is "PlayerPawn"))
Bitwise operators
Bitwise operators are used to deal with bit fields. Many of them are likely to appear only in rather advanced code, but it’s still important to understand at least the general concepts behind them, and some of these operators are actually very useful and common.
Bit fields are a specific type of data structure. In GZDoom their primary application is function flags. For example, A_WeaponReady supports various flags, such as WRF_NOPRIMARY, WRF_NOSECONDARY, WRF_NOSWITCH. The flags argument is special, because it’s a single argument that can have multiple values combined in any order and number. It’s possible because the flags argument is actually an integer value that functions as a bit field: what it means is that internally each flag is a number, those numbers are added to each when you define the flags, and the final number tells the game which combination of flags to use. The flag names, such as “WRF_NOPRIMARY”, are just aliases for the actual numeric values.
It’s important to know that, because as a result you can’t use operators such as == or || with flags; instead they need special bitwise operators that can interact with the bit field that contains the flags.
Another common example of a bit field is player input: whenever player presses a button, the bit field that contains the inputs (player.cmd.buttons) is changed. Obviously, multiple buttons can be pressed at the same time, so the field dynamically stores those values. You can get access to the player’s input bit field either by using GetPlayerInput() function or just by accessing the cmd.buttons field when you have a pointer to the player (so, for example, from a weapon state it’ll be player.cmd.buttons).
-
|— bitwise OR. Most commonly used to combine flags together, for example:// This will make the weapon ready for fire but // won't let you either fire the secondary attack // or switch the weapon: A_WeaponReady(WRF_NOSECONDARY|WRF_NOSWITCH); -
|=— a combination of OR and a setter, it’s primarily used to set flags. It functions by appending flags to the bit field, so that you can set multiple flags this way without clearing the field:// Define a flag field that contains // the DMG_THRUSTLESS flag in it: int fflags = DMG_THRUSTLESS; // Do the following with a 30% chance: if (random(1,3) == 3) { // Add the DMG_NO_PAIN flag to fflags: fflags |= DMG_NO_PAIN; } // Call DamageMobj on the target with the // defined flags: target.DamageMobj(self,self,10,'normal',flags:fflags);Result: this block will always deal damage without any thrust but will only sometimes also not cause pain.
-
&— bitwise AND. Most commonly used to check if a value is present in the bit field. For example:if (player.cmd.buttons & BT_FIRE) { // True if the player is currently // pressing the Fire key, among others }As mentioned above,
==won’t work here because thecmd.buttonsfield contains all currently pressed keys. By using&you check if the player is pressing anything as well as the key you’re checking for. -
&=— a combination of bitwise AND and the assignment operator=. Its most common application is to unset flags in combination with~(see below). -
~— bitwise NOT. It’s most commonly used in combination with&=to unset flags as follows:myflags &= ~FLAGNAME; //This will remove `FLAGNAME` flag from the myFlags fieldBelow is an inverted way to define the same block used in the example above, except here the flag field already contains both flags, and with a randomized chance we remove one of them before calling
DamageMobj():// Define a flag field that contains // two flags: int fflags = DMG_THRUSTLESS|DMG_NO_PAIN; // With a 60% chance: if (random(1,3) > 1) { // remove one of the flags: fflags &= ~DMG_NO_PAIN; } // Call DamageMobj with the resulting flags: target.DamageMobj(self,self,10,'normal',flags:fflags);
Miscellaneous operators
-
is— checks whether the operand is a specific class or is a class that inherits from the given class:class Imp1 : DoomImp {} // In some other place in the code: actor a = Spawn("Imp1",pos); if (a is "DoomImp") { // This will be called because // the spawned Imp1 inherits from DoomImp }A restrictive alternative to this operator is
GetClass()function which returns true only if the operand is the specific class provided:class Imp1 : DoomImp {} // In some other place in the code: actor a = Spawn("Imp1",pos); if (a.GetClass() == "DoomImp") { // This will not be called because the spawned // Imp1 inherits from DoomImp but is NOT DoomImp }``` -
?— ternary operator, functions as a shorter version of an if/else block. Doesn’t affect performance and is only used for convenience.The syntax for using a ternary operator is as follows:
<boolean value> = <condition> ? <value if true> : <value if false>
Examples:
// Regular if/else block:

int i;
// Check if the calling actor has
// the NOGRAVITY flag:
if (bNOGRAVITY)
{
    i = 10;    // if so, set i to 10
}
else
{
    i = 5;    // otherwise set i to 5
}

// Same thing with a ternary operator:
int i = bNOGRAVITY ? 10 : 5;
Among other things, using it can be convenient in function arguments:
// All three variants below will set the calling actor's
// mass to 1000 if they have +BOSS flag, otherwise the
// mass will be set to 100.

// Basic if/else:
if (bBOSS)
{
    A_SetMass(1000);
}
else
{
    A_SetMass(100);
}

// Aa more versatile but longer version:
int i;
if (bBOSS)
{
    i = 1000;
}
else
{
    i = 100;
}
A_SetMass(i);

// A ternary operator:
A_SetMass(bBOSS ? 1000 : 100);
Statements
Statements in ZScript (similarly to C# and other C-style languages) are special keywords that make sure that specific code blocks are executed only if specific conditions are met. Statements define those conditions.
Every statement is defined as follows:
keyword (condition)
{
    code;
}
…where keyword is a statement (if, else, for and others), condition is the condition that should be met for the code to execute (it must be defined within parentheses and must not end with a semicolon), and a pair of curly braces following it define a new code block.
If you have experience with ACS, it’s important to know at this point that ZScript doesn’t have a delay function. The reason for that is actually very simple: whereas ACS is used to define a sequence of events that happens in a map (and those events can be relatively disconnected, e.g. a monster spawns here, a platform raises there, a wall changes its texture, etc.), ZScript is predominantly used to define behavior for specific classes. As such, it’s not a set of abstract instructions but rather a set of actions that class has to perform. ZScript code is primarily called as follows:
- Every game tic: this goes for the code defined in
Tick()orDoEffect()and many other virtual functions that need to be called every tic so that the actor would be able to collide with other actors, move, be subjected to gravity, and such. - Every frame: this is true for everything related to user interface (UI), such as in-game menus and HUDs that need to be drawn (and updated) every frame.
- Once when a specific condition is met: for example the code in a
WorldThingDied()event is called once, every time an actor dies in a map. - Once when a specific frame is drawn in an actor state: e.g. when you call
PIST F 5 A_FireBullets()in a weapon state, the functionA_FireBullets()will be called once when PISTF frame is drawn on the screen.
In all of those cases all of the code defined in a specific function/override is executed from top to bottom but instantly, within a single tic (or frame). If you want to delay some of the code, you have to find a way to manually call it later, in a different game tic.
Note: there’s no completely fixed terminology regarding the classification of statements, and it’s also important to remember that ZScript contains fewer statements than C# and other C-style languages. As such, the classification used in this guide may be purposefully simplified for the sake of clarity and beginner-friendliness.
Conditional blocks
if
if statement is the most basic statement that defines a condition. It works as follows:
//pseudocode:
if (condition == true)
{
    DoStuff();
}
//Real code:
int num = random(0,100);
if (num >= 80)
{
    A_Explode();
}
In this example num >= 80 is the condition. If num (a previously defined random integer value between 0 and 100) ends up being more than or equal to 80, A_Explode() will be called.
It can be simplified as follows:
if (random(0,100) >= 80)
{
    A_Explode();
}
Note that in the example above random automatically creates an integer value, you don’t need to define a separate variable for that. If you want a double instead of an integer, you need to use frandom.
else
else is a statement that is meant to follow if and defines another block that will be executed if the original condition isn’t met:
// pseudocode:
if (condition == true)
{
    DoThis();
}
else
{
    DoThat();
}
The else block must be defined immediately after the end of the if block; you can’t insert anything between them.
You don’t have to define an else block.:
if (condition)
{
    Do();
}
else {} //don't do this if you don't have any code here, it's pointless!
else if
else if is a combined statement that also follows an if block and is called when the original condition is false, but it also defines an extra condition:
if (condition1 == true)
{
    DoThis();
}
else if (condition2 == true)
{
    DoThat();
}
In the above example DoThat() will only be called if condition is false AND condition2 is true.
else if can be followed by an else block:
if (condition1 == true)
{
    DoThis();
}
else if (condition2 == true)
{
    DoThat();
}
else
{
    DoSomethingElse();
}
In this example DoSomethingElse() will be executed when both condition1 and condition2 are false.
It’s possible to string any number of if/else if blocks, but if you have more than 2, using a switch block may be recommended instead (see below).
Switch
A switch block is essentially a shorthand for creating multiple if/else if blocks that simply looks better. There are a few rules regarding switch blocks you need to know to effectively utilize them, however.
The structure of a switch block in comparison to a series of if/else if blocks looks as follows:
//if/else:
if (condition1)
    DoStuff1();
else if (condition2)
    DoStuff2();
else if (condition3)
    DoStuff3();

//switch:
switch
{
case (condition1):
    DoStuff1();
    break;
case (condition2):
    DoStuff2();
    break;
case (condition3):
    DoStuff3();
    break;
}
In terms of structure a switch block is very similar to a States block of an actor (see State control below for details):
casekeyword defines a sub-block (which in case of an actor would be a state sequence);breakdefines where that specificcaseblock should end (similarly to how in state sequences we usestop);- if
breakis omitted, the execution will just fall through to the next case (that’s why using it is important!)
A switch block, unfortunately, is limited in what data types you can use in it: it can only check for names and integer values. One good application for it is, for example, in a CheckReplacement event, if you use it to handle actor replacements in your mod instead of the replaces keyword:
override void CheckReplacement(replaceEvent e)
{
    let classname = e.Replacee.GetClassName();
    switch (classname)
    {
    case 'Zombieman':
        e.Replacement = "MyZombieman";
        break;
    case 'ShotgunGuy':
        e.Replacement = "MyShotgunGuy";
        break;
    case 'ChaingunGuy':
        e.Replacement = "MyChaingunGuy";
        break;
    [...]//and so on
    }
}
You can insert randomization inside a switch block as well:
    switch (classname)
    {
    case 'Zombieman':
        if (frandom(0,10) > 8.5)
        {
            e.Replacement = "Cyberdemon";
        }
        else
        {
            e.Replacement = "MyZombieman";
        }
        break;
    [...]
    }
Loop control
You can define various types of loops within ZScript code, and there are special statements used to control those loops. As mentioned earlier, ZScript doesn’t have a delay function, so all loops that happen within a function (be it an anonymous, virtual or custom function) happen instantly. Loops are convenient when you need to call the same function multiple times (e.g. when you want to spawn a bunch of objects by calling A_SpawnItemEx but don’t want to copy-paste it 20 times), or when you need to iterate over some sort of data.
while
while is a statement that begins a loop which will be executed as long as the condition in that loop is true:
while (condition == true)
{
    DoStuff();
    // If the 'condition' becomes false
    // in the process, the loop will end.
}
Example:
int i = random(10,15);
while (i > 0)
{
    A_SpawnItemEx("CustomDebris",xvel:frandom(-5,5),yvel:frandom(-5,5),zvel:frandom(3,6));
    i--;
}
In the above block the function A_SpawnItemEx is designed to spawn a custom debris actor and give it randomized velocity. The way it’s set up, it’ll be called randomly between 10 and 15 times.
The condition doesn’t have to be a custom value, it can also be a part of what you’re doing in the loop:
while (pitch > -45)
{
    A_SpawnProjectile("DoomImpBall",flags:CMF_AIMDIRECTION,pitch:pitch);
    pitch -= 10;
}
In this block the calling actor will fire an Imp fireball using its own pitch, then will move its pitch by 10 units. The block will loop only as long as pitch is above -45 units (since negative pitch means the actor is looking up, this will result in the actor shooting a bunch of projectiles in front of itself, some of them aimed upward).
You can also set up an endless loop by doing while (true) (since, well, true is always true), but if you do that, you need to use break at some point to stop it see break).
for
for is a more robust loop-starting statement that can be used similarly to while:
//psuedocode:
for (<initial value>; <condition to check before each loop>; <what to do after each loop>)
In a for loop the “initial value” is usually an integer number that will define the number of iterations. “Condition” normally defines what to check the counter value against, and “what to do” is how the counter value will be modified with every iteration of the loop.
A typical for loop looks like this:
for (int i = 10; i > 0; i--)
{
    // This block will be repeated 10 times
}
In the block above the loop first defines an integer value i that is equal to 10. Then it defines the condition: the loop will repeat as long as i is larger than 0 (i > 0). The last point defines that with every iteration of the loop i should decrease by 1 (i--).
You can invert the values, it won’t make any difference:
for (int i = 0; i < 10; i++)
{
    // This block will be repeated 10 times
}
The order of iteration in a for loop works like this:
- The initial value (e.g.
int i = 0) is defined and used only once. - At the start of each iteration the loop will check the condition (e.g.
i < 10). If the condition is false, the loop won’t execute. If it’s true, it’ll start executing the code block. - After everything in the code block has been executed, the
forloop will automatically perform the change (e.g.i++) and will go back to #2.
Note that a for loop will first execute everything in it, and after that it’ll change the counter value (i in this example), after which it’ll check if the counter value still fulfills the condition. That means that in the example at the first iteration i will be equal to 0, and at the 10th iteration i will be equal to 9. Once the 10th iteration ends, i will become equal to 10, which means the condition i < 10 will no longer be true. You can change the condition to be i <= 10, but in this case the loop will execute 11 times. This distinction may be important in specific conditions (described further below).
There are multiple convenient applications for for loops. The simplest one is to use them as a shorter version of while loops:
// This will repeat 10 times:
int i = 10;
while (i > 0)
{
    A_SpawnItemEx("RandomDebris",xvel:frandom(-5,5),yvel:frandom(-5,5),zvel:frandom(3,5));
    i--;
}

// This will also repeat 10 times:
for (int i = 10; i > 0; i--)
{
    A_SpawnItemEx("RandomDebris",xvel:frandom(-5,5),yvel:frandom(-5,5),zvel:frandom(3,5));
}
Note that you can make the initial value randomized if you want a random number of repetitions. For example, if you want to spawn some sort of debris/particles and you want to spawn a random number of them each time:
// This loop will execute between 8-12 times:
for (int i = random(8,12); i > 0; i--)
{
    A_SpawnItemEx("RandomDebris",xvel:frandom(-5,5),yvel:frandom(-5,5),zvel:frandom(3,5));
}
Note that normally you should only randomize the counter value, not the condition value, because, as described above, the condition is checked with every iteration of the loop. Which means, if you randomize the condition, it’ll actually check against a random number every time:
/*
    This will check 'i' against a random value between 8-12 with every iteration of the loop.
    Normally this is not a good idea, since it offers you less control over how many
    repetitions you'll actually have. It'll also be slightly less peformance-efficient
    since a random value will need to be defined with every iteration, and that requires
    some CPU resources.
*/
for (int i = 0; i < random(8,12); i++)
{
    A_SpawnItemEx("RandomDebris",xvel:frandom(-5,5),yvel:frandom(-5,5),zvel:frandom(3,5));
}
The counter value i is a variable that exists within the loop itself and can be used literally there:
for (int i = 0; i < 5; i++)
{
    /*
        Spawnheight of the spawned projectile is defined as i * 8,
        which means that 5 imp orbs will be fired, each spawned
        8 units above the previous one:
    */
    A_SpawnProjectile("DoomImpBall", i * 8);
}
While usually the change is defined as incrementing i by 1, it’s also perfectly possible to use a different value. For example, in this block i is increased by 30 with every iteration, and the loop is repeated until it reaches 360:
// This will fire imp fireballs in a circle, a new fireball
// every 30 degrees (i.e. 12 fireballs in total):

for (int i = 0; i < 360; i += 30)
{
    A_SpawnProjectile("DoomImpBall", angle: i);
}
One of the most common advanced applications of for loops is iterating through arrays. For example:
// This zombie will drop a trap every 10 seconds.
// Once it's killed, all existing traps will be destroyed.
class ZombieTrapper : Zombieman
{
    array Actor traps; //array of pointers to traps
    override void Tick()
    {
        super.Tick();
        //spawn a trap if zombie isn't frozen, and its age is divisible by 350
        if (!isFrozen() && GetAge() % 350 == 0)
        {
            let trp = Spawn("ZombieTrap",pos);
            if (trp)
                traps.Push(trp); //push the trap into array
        }
    }
    States
    {
    Death:
        TNT1 A 0 {
            //iterate through the array:
            for (int i = 0; i < traps.Size(); i++)
            {
                let trp = traps[i]; //get a pointer to the trap
                if (trp) //check the pointer isn't null (trap still exists)
                    trp.Destroy(); //if so, destroy it
            }
        }
        goto super::Death;
    }
}
Note, it’s very important to remember that an array’s size is always larger than the index of the last item in it. So, for example, if there are 5 actors in an array, the size of that array will be 5, but indexes of actors in that array will go from 0 to 4 (0 being the first actor, 4 being the last). That’s why when creating for loops that iterate through arrays, they must always use one of the two templates:
//either this:
for (int i = 0; i < arrayname.Size(); i++)
{
    arrayname[i].DoSomething();
}

//or this:
for (int i = arrayname.Size() - 1; i >= 0; i--)
{
    arrayname[i].DoSomething();
}
In other words:
imust never be equal to the array’s size if you use it as an index, because you’ll get an “out of bounds” error.- Also, if you use the second template the condition must be
i >= 0, because if you make iti > 0, the loop won’t iterate through the first item in the array, since its index is 0.
It’s also important to know that FOR loops are not actually limited to numbers. Other conditions can be utilized as well. Iterating through linked lists is one common example of doing that.
break
break stops the execution of a loop and continues whatever comes next after it. It can be used in while or for loops.
In the following example let’s assume you previously created a dynamic array monsters that contains pointers to various monsters. Now you want to check if any of those monsters is currently targeting the player:
bool playerIsTargeted;
for (int i = 0; i < monsters.Size(); i++)
{
    if (monsters[i] && monsters[i].target && monsters.[i].target.player)
    {
            playerIsTargeted = true;
            break;
    }
}
playerIsTargeted will be set to true immediately as the first monster who has player as its target is found in the array.
In the following example a for loop is used inside a custom function to find if any of the players in the game have a red key card:
bool hascard;
for (int i = 0; i < MAXPLAYERS; i++)
{
    if (players[i] && players[i].mo && players.[i].mo.FindInventory("RedCard"))
    {
            hascard = true;
            break;
    }
}
Notes:
playersis a global GZDoom array that containsPlayerInfotype pointers to all players in the game.MAXPLAYERis a global GZDoom variable that is equal to the total number of players in the game.mo(short for “map object”) is a pointer to the PlayerPawn controlled by a specific player (a PlayerPawn is a separate entity from the player); if you need to check if a player has something in their inventory, you need to use that.
continue
continue is in a way a “reverse” of break: it tells the loop to stop executing and move on to the next iteration without doing anything else inside the loop block.
bool playerIsTargeted;
for (int i = 0; i < monsters.Size(); i++)
{
    if (!monsters[i])
    {
        continue; //do nothing if that item in the array is null
    }
    if (!monsters[i].target)
    {
        continue; //do nothing if the monster has no target
    }
    if (!monsters.[i].target.player)
    {
        continue; //do nothing if that monster's target isn't player
    }
    playerIsTargeted = true; //OTHERWISE set the bool to true
}
Return and return values
return keyword has two uses: it tells ends the execution of a function, and, if possible, it also defines a return value. The use of return is mostly covered in the Custom functions chapter. To briefly reiterate, return can be used to stop the execution of a function—be it a custom function or an override of an existing virtual function:
override void Tick()
{
    super.Tick();
    if (isFrozen())
    {
        return; //stop execution if the monster is frozen
    }
    Warp(self,frandom(-1,1),frandom(-1,1),0); //this will make the monster constantly jitter slightly
}
It’s important to note that return can’t be used to stop the execution of a specific conditional code block (like an if block); it’ll abort the execution of the whole function. This can actually be useful when working with non-void functions that need to iterate over something:
//this function will return true only if ALL players have the desired item:
bool CheckAllPlayersHaveItem(Class<Inventory> item)
{
    for (int i = 0; i < MAXPLAYERS; i++)
    {
        if (!players[i] || !players[i].mo)
        {
            continue; //do nothing if that player in the players array isn't valid and continue checking
        }
        if (!players.[i].mo.FindInventory(item))
        {
            return false; //if the player doesn't have the item, immediately return false
        }
    }
    return true;
}
In the example above as soon as return false; is called, the for loop will stop and the rest of the function or the loop won’t be executed; the return value will be set to false. If each player iterated through has the item, the function will return true.
Anonymous functions in actor states also have a return value—the next state to jump to, which can be obtained via ResolveState(<state label>):
TNT1 A 0
{
    if (CountInv("Clip") <= 0)
    {
        return ResolveState("Reload"); //if no ammo, jump to Reload sequence
    }
    return ResolveState(null); //otherwise, don't jump, move on to the next frame
}
State control
Actor states in ZScript can be compared to a code block, but they have a number of peculiarities. Before we dive in, it’s important to note that there’s a lot of confusion surrounding what exactly the term “state” means, so here’s a quick overview of the key terms:
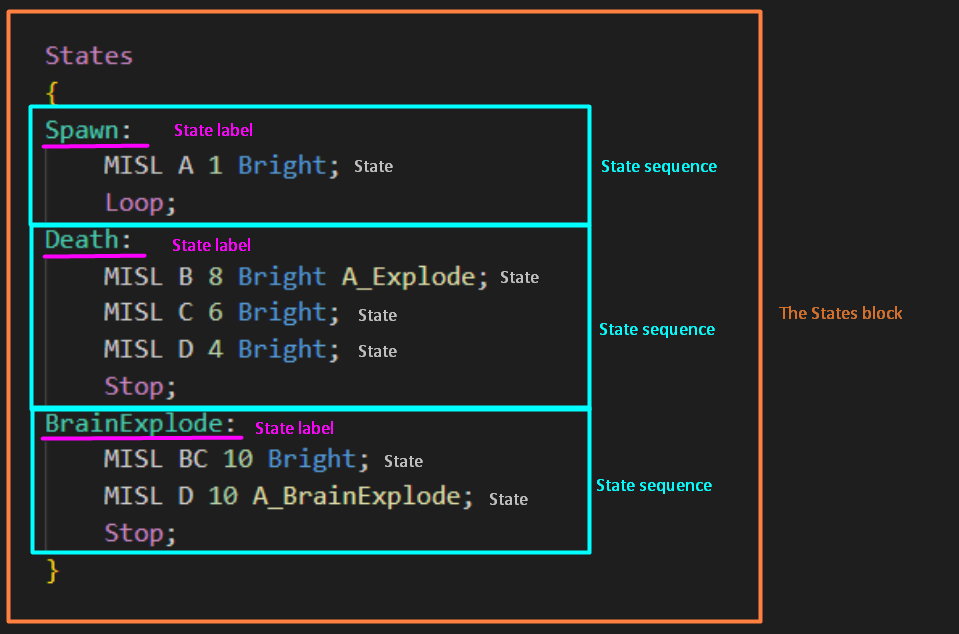
- Everything that starts after the
Statesheader in an Actor definition is a states block. - The titles such as
Spawn,See,Deathare called a state labels. - Everything that goes after a state label and until an operator (such as
stop,loop,wait,goto) is called a state sequence. - Every separate frame inside a state sequence is called a state.
As you know, you can attach functions and code blocks (i.e. anonymous functions) to states inside the states block. The state sequences inside a state block, however, have their own flow operators. They’re the same as in DECORATE, but it’s still important to understand how they work and what peculiarities they have.
stop
Ends the sequence and removes whatever called it. If stop is used in an actor, the actor will be immediately destroyed. If it’s used in a weapon sprite, the layer where it was called, will be destroyed (which means, if this is done from the main weapon layer, the weapon will essentially become unusable).
Arguably the most common application is in missiles:
//from DoomImpBall:
    Death:
        BAL1 CDE 6 BRIGHT;
        Stop; //disappear
If the last state before stop has a tic duration of -1, the called will not be destroyed. Instead, it’ll just remain inactive, not animating but still being subject to physics, such as gravity:
//from DoomImp:
    Death:
        TROO I 8;
        TROO J 8 A_Scream;
        TROO K 6;
        TROO L 6 A_NoBlocking;
        TROO M -1;
        Stop; //will continue to exist, displaying only TROOM sprite
loop
Loops all of the states up to the most recent state label:
//from DoomImp:
    See:
        TROO AABBCCDD 3 A_Chase;
        Loop; //go back to See label and start from there
If there was an intentional fall-through from one state sequence to another, loop will only loop to the most recent label. This can be useful:
Spawn:
    FRAM ABC 2;
//falls through since there's no operator
SpawnLoop:
    FRAM D 1;
    loop; //loop starting from SpawnLoop, not Spawn
Warning: do not loop states that have 0 duration and no way of jumping to anywhere. This is a common issue that will freeze GZDoom:
Ready:
    PISG A 0 A_WeaponReady; //this will freeze the game!
    loop;
However, it’s fine to loop a zero-duration state that has a jump attached. For example, A_Raise() jumps to the Ready sequence as soon as the weapon sprite has been raised high enough, and by calling it on a zero-duration state you can make weapon selection instant:
Select:
    TNT1 A 0 A_Raise;
    loop; //will select instantly and jump to Ready
Ready:
    PISG A 1 A_WeaponReady;
    loop;
wait
Loops the most recent state. Can be more convenient than loop if you need specifically to loop the last frame in the animation:
Spawn:
    FRAM ABCD 2;
    wait; //this will loop frame D only
It’s also a good way to loop the execution of a specific function without looping the whole animation. For example, the projectile below will slowly fade out while increasing in size, and it’ll continue fading out until it disappears even when there are no more sprites to animate:
Death:
    BAL1 CCDDE 2 bright;
    BAL1 E 2 bright
    {
        A_FadeOut(0.05);
        scale *= 1.05;
    }
    wait;
This can be useful for effects such as smoke clouds.
goto
goto <state label> is used to jump to another state sequence:
//from ChainGunGuy:
    Raise:
        CPOS N 5;
        CPOS MLKJIH 5;
        Goto See; //jumps back to See state sequence
goto supports offsets: goto <state label> +# where # is a number that tells it how far to jump from the specified state label:
//from ChainGunGuy:
    Missile:
        CPOS E 10 A_FaceTarget;
        // here... <-------------------------------------------------------------------|
        CPOS FE 4 BRIGHT A_CPosAttack;                                               //|
        CPOS F 1 A_CPosRefire; //will jump to See state if the target is out of sight  |
        Goto Missile+1; //otherwise jump...--------------------------------------------|
Goto Missile+1 means “jump to the beginning of the Missile sequence but skip ahead 1 state.”
goto super::<state label> will jump to the parent’s state label, if actor has one:
class ZombieTrapper : Zombieman
{
    States
    {
    Death:
        TNT1 A 0
        {
            Spawn("ZombieTrap",pos);
        }
        goto super::Death; //go to regular Zombieman's Death sequence
    }
}
Using goto and inheritance
It’s important to remember that goto performs the jump within the actor, it’s unaffected by inheritance. Goto Label in the parent actor will always jump to the Label sequence inside that actor, even if the child actor defines the same state label:
class ParentActor : Actor
{
    States
    {
    Spawn:
        FRAM ABC 1;
        goto Death; //this will only go to Death within this actor
    Death:
        FRAM DE 1;
        stop;
    }
}

class ChildActor : ParentActor
{
    States
    {
    Death: //this will never be entered, because parent Death will be used instead
        FRAM AB 1;
        loop;
    }
}
The only way to create gotos that work properly with inheritance is to use dynamic jumps instead—i.e. the A_Jump* functions or return ResolveState("<state label>"). For example:
class ParentActor : Actor
{
    States
    {
    Spawn:
        FRAM ABC 1;
        TNT1 A 0 A_Jump(256,"Death");
        wait; //it's OK to loop a 0-tic state here, since it contains a 100% chance jump
    Death:
        FRAM DE 1;
        stop;
    }
}

class ChildActor : ParentActor
{
    States
    {
    Death: //this will be entered properly
        FRAM AB 1;
        loop;
    }
}
This will also work:
TNT1 A 0
{
    return ResolveState("Death");
}
(See Dynamic and static jumps below for more details.)
The reverse, however, is not a problem: since child actors inherit all of their parents states, goto will enter a parent’s state correctly. That’s why you can create a monster replacement with only a Missile sequence that ends with Goto See and it’ll use its parent’s See sequence correctly.
Using goto with offset
Goto supports offsets: goto Label+# will jump # frames from the beginning of the Label sequence. E.g.:
//ChaingunGuy:
    Missile:
        CPOS E 10 A_FaceTarget;
        CPOS FE 4 BRIGHT A_CPosAttack;
        CPOS F 1 A_CPosRefire;
        Goto Missile+1; //this will skip CPOS E 10 A_FaceTarget
It’s recommended not to use this feature very heavily in custom actors, since it’s very easy to lose track of the offset, especially if the actor gets edited later and new states are added to it. Since nowadays there’s no limit to creating custom state labels, it’s preferable to use those labels when possible. ChaingunGuy’s Missile sequence could be redone like this with this in mind:
    Missile:
        CPOS E 10 A_FaceTarget;
    MissileDo:
        CPOS FE 4 BRIGHT A_CPosAttack;
        CPOS F 1 A_CPosRefire;
        loop;
fail
Fail is an operator used specifically by the CustomInventory class. Calling fail at the end of its Use state sequence prevents the used item from being removed from the player’s inventory. Has no other applications.
Fall-through (no operator)
If there’s nothing at the end of a state sequence, the state machine will just fall through to the next sequence:
Fire:
    WEAP AB 2;
//fall through to Hold:
Hold:
    WEAP C 1 A_FirePistol();
    WEAP DEF 2;
    WEAP A 5 A_ReFire(); //jumps back to Hold if Fire is held
    goto Ready;
This can be created by design (such as in the example above where A_ReFire() is used to only loop the Hold sequence without returning to Fire) but can also cause issues if this is done by accident.
It’s important to remember that state labels themselves will never prevent the state machine from progressing. In fact, state labels don't *really* exist—for the game, that is; state labels are only visible to the coder and exist for convenience. That’s why flow operators must always be employed to avoid unintentional fall-through from one state sequence to another.
State jumps
State jumps are cases when the execution of one state sequence stops and moves to another state or state sequence. There are different ways to categorize state jumps and different ways to perform them.
Dynamic and static jumps
Jumps can be dynamic and static. Goto is the only example of a static jump in ZScript. As for dynamic jumps, the most common example are the various A_Jump* functions in ZScript/Decorat (those include A_JumpIf, A_JumpIfNoAmmo, A_JumpIfInventory and others).
As described in the Using goto and inheritance section above, goto can’t be properly inherited because it’ll jump into a state in the original actor. That happens precisely because it’s a static jump; you can create an inheritance-friendly state transition by using a dynamic jump instead:
//static jump:
Spawn:
    FRAM ABC 1;
    goto Death;


//an equivalent with a dynamic jump:
Spawn:
    FRAM ABC 1;
    TNT1 A 0 A_Jump(256,"Death");
    wait;
Jumps in anonymous functions
One of the common issues people face when transitioning from DECORATE to ZScript is their jump functions not working as expected in anonymous functions:
//this does not work:
TNT1 A 0
{
    A_Explode();
    A_Quake();
    A_JumpIfHealthLower(25, "Death");
}
To work, jump functions called from anonymous functions require a return keyword to work:
TNT1 A 0
{
    A_Explode();
    A_Quake();
    return A_JumpIfHealthLower(25, "Death");
}
But there’s a number of things that should be kept in mind. And it’s better to fully understand how exactly the state machine performs and why jumps have to be returned.
Every tic actors try to progress their states and move from the current state to the next one. States actually have return values: a state’s return value is the next state that the state machine should go to. By default that value is null which is interpreted as “the next state in the states block”—this is how normal actor animation/state execution works.
So, by default states silently call return null and move to the next frame. A_Jump and similar functions also implicitly call a return if they’re the only function attached to a state:
TNT1 A 0 A_Jump(256, "Death"); //returns "Death" with 100% probability
TNT1 A 0 A_Jump(128, "Death"); //this returns "Death" with 50% chance, or returns null (= proceed to next state)
However, if you have an anonymous function block, return values have to be defined explicitly—and that’s why you need a return <jump function> in order for a jump function to work correctly.
There is a number of caveats here, though. The first one is that A_Jump* always performs a state jump: it either returns a state you specify, or null and jump to the next state. As a result, you can’t place A_Jump in the middle of an anonymous function, because nothing that comes after it will ever be executed. For example:
FRAM A 1
{
    A_Quake();
    return A_Jump(128, "Death"); //this jumps to "Death" 50% chance or returns null...
    A_Explode(); // This will never be called!
}
FRAM B 1;    // ...the null return jumps here
So, if you call any form of A_Jump*, there’s no way to force it to return nothing; it’ll always return a state and perform a jump.
However, there are ZScript-specific jump methods that allow performing multiple jumps from different places.
Finding and returning states in ZScript
To have more control over state jumps, you can find and returns the desired states manually instead of using ready-made functions.
There are two functions that can find a state by checking for a specific state label:
FindState("State label")looks for the specified state label and returns the first state of that state sequence.ResolveState("State label")works similarly but is also context-aware. This basically means that it can be safely called from weapon or CustomInventory states, and ZScript will properly look for the state within said weapon/CustomInventory, not being confused about whether it should look for a state label on the player pawn holding it. CallingFindStatein from a Weapon/CustomInventory will try to find the state in the player pawn that is the owner of the weapon/item, rather than in the weapon/item itself, creating ambiguous context and potentially aborting GZDoom.- It will also work on regular actors, so most of the time it’s safe to use
ResolveState()in any context.
- It will also work on regular actors, so most of the time it’s safe to use
- If you have a conditional state return anywhere within the function, you have to put
return nullat the end of that function to explicitly tell it that if the first jump doesn’t happen, it has to go to the next state.- In weapons you have to use
return ResolveState(null)instead. (See Weapons, overlays and PSprite for more details.)
- In weapons you have to use
Using FindState() and ResolveState() allows us to create conditional jumps inside anonymous functions:
Fire:
    PISG A 1
    {
        //check if the amount of primary ammo is too low and jump to Reload if so:
        if (invoker.ammo1.amount < invoker.ammouse1)
        {
            return ResolveState("Reload");
        }
        //otherwise continue execution:
        A_GunFlash();
        A_FirePistol();
        //explicitly move to the next state:
        return ResolveState(null);
    }
    PISG B 1;
    [...] //the rest of the sequence
It’s important to remember that if you use return with FindState() or ResolveState() somewhere within the anonymous function, you have to cover all possible cases. If one jump is conditional (like a jump to the “Reload” sequence in the example above), then you have to add another return at the end of the anonymous function to tell it where to go if the first condition isn’t met. If you don’t have any specific alternative condition, then you have to add return null to tell the function to simply continue with the current state sequence (or return ResolveState(null), if you’re doing it from a weapon state).
To illustrate:
//This does not work, GZDoom won't run:
TNT1 A 0
{
    if (condition == true)
    {
        return ResolveState("GoHere"); //jump if the condition is true
    }
    DoStuff();
    DoMoreStuff();
    //the function doesn't know where to go if the above condition is false
}

//This will work properly:
TNT1 A 0
{
    if (condition == true)
    {
        return ResolveState("GoHere"); //jump if the condition is true
    }
    DoStuff();
    DoMoreStuff();
    return ResolveState(null); //proceed to next state
}

//This will work as well:
TNT1 A 0
{
    if (condition == true)
    {
        return ResolveState("GoHere"); //jump if the condition is true
    }
    DoStuff();
    DoMoreStuff();
    return ResolveState("GoThere"); //jump to a different state
}
// Note that in this ^ version null is never returned, so
// the execution will never move to the next state in the
// sequence.
In contrast to returning A_Jump* functions, this method allows using multiple conditions:
Death:
    TNT1 A 0
    {
        if (health <= -60)
        {
            return FindState("XDeath");
        }
        if (health <= -15)
        {
            return FindState("Dismemberment");
        }
        return null;
    }
    goto super::Death; //go to the original Death sequence
Dismemberment:
    [...] //special new animation
In this example there are several variations of the death animation for the monster. (Note, when a monster is killed, their health may become negative, so the above code is valid.) If the monster’s health was pushed far below zero, it shows a gibbing animation, but if it’s only under -15, it jumps to a new Dismemberment sequence. If neither condition is meant (the monster is dead but its health is between 0 and -15), it displays its parent’s Death sequence.
Checking current state sequence
InStateSequence(<current state>, <state sequence>) is a static boolean function that returns true if the specified state is currently inside the specified state sequence. Normally it’s used to check which state sequence the actor is currently in. To do that, the first argument should contain a pointer to the current state (curstate for actors), while the second argument should be a pointer to a state sequence (obtained via FindState or ResolveState). For example:
if (InStateSequence(curstate, ResolveState("Missile")))
{
    // Executed when the calling actor is in its
    // "Missile" state sequence.
}
The function can be used on any actor that the caller has a pointer to:
if (target && InStateSequence(target.curstate, target.ResolveState("Missile")))
{
    // Executed when the calling actor has a target
    // and that target is in its "Missile" state
    // sequence.
}
Note, since this is a static function, the caller is irrelevant. In the example above you can call target.InStateSequence instead of InStateSequence, but it’ll work exactly in the same way. The arguments will still need a target prefix because their values are taken from the actor who calls the code block.
When called from a Weapon or a CustomInventory, the state has to be obtained from the PSprite, since it’s the PSprite that handles the sprite drawing for those classes (see the Weapons, Ovelays and PSprite chapter for details). For example:
// This pistol will give 1 HP to its owner every second:
class HealingPistol : Pistol
{
    override void DoEffect()
    {
        super.DoEffect();
        // Double-check the owner exists, is a player,
        // and is alive:
        if (!owner || !owner.player || owner.health <= 0)
        {
            return;
        }
        // Do nothing if the currently selected weapon
        // is not this one:
        if (owner.player.readyweapon != self)
        {
            return;
        }
        // This effect should happen only once a second,
        // so we do nothing if this modulo expression
        // isn't equal to 0:
        if (level.time % TICRATE != 0)
        {
            return;
        }
        // Get a pointer to the main sprite layer:
        let psp = owner.player.FindPSprite(PSP_Weapon);
        // Null-check the pointer, then check its curstate
        // is in this weapon's Ready sequence
        if (psp && InStateSequence(psp.curstate, ResolveState("Ready")))
        {
            owner.GiveBody(1); //heal 1 HP
        }
    }
}
This pistol will heal 1 HP to the player every second while it’s selected and is also in its Ready sequence.